
Testing React Web Apps with Mocha
14 Feb 2015Unit testing is an essential part of software engineering. Tests provide living documentation of expected behaviors, prevent regressions, and facilitate refactoring. Web applications benefit from testing as much as any other kind of software.
In recent years there’s been a proliferation of JavaScript frameworks and testing tools. Piecing together a combination of tools that works well can be daunting. We use React.js components in CycleDash, so in this post I’ll describe our usage of Mocha for testing React with JSX and ECMAScript 6 (Harmony).
If you want to skip straight to using the setup described here, check out this repo. There’s also a follow-up post which talks about generating code coverage data.
How About Jest?
![]()
Facebook recommends using Jest for testing React apps. Jest is a testing framework based on Jasmine that adds a few helpful features for testing React-based applications:
- A fake DOM
- Support for JSX out of the box
- Auto-mocking of modules
We used Jest for a few months, and it certainly makes it easy to start writing tests for React apps. That said, we ran into some pain points and missing features:
- Cryptic error messages. Long stack traces that are missing important information.
- Incompatibilities. For example, there was some kind of problem with Jest and contextify, a widely-used node.js library. D3 required jsdom, which required contextify, so we couldn’t test D3 components with Jest.
- Slow test execution. Startup time was particularly bad. It was common to wait 5-10 seconds for a single test to run.
We also began to realize that, while auto-mocking reduces test dependencies and can result in faster and more “unit-y” tests, it can have some negative consequences. What if you factor a sub-component out into its own module? Or extract a utility library? The API and behavior of your code is unchanged, but auto-mocking will make all of your tests break. It exposes what should be an implementation detail. And, because Jest mocks modules by making all their
methods return undefined, this usually manifests itself in the form of cryptic errors stating that undefined is not a function.
Setting Up Mocha

Once we decided to use another testing framework, we considered Mocha, Jasmine, and QUnit. Because we were using node-style require statements, QUnit wasn’t a natural fit. Mocha is widely used and appears well supported, so we decided to run with it.
While it is very easy to get up and running with React testing using Jest, doing the same with Mocha is a bit more involved. To get our tests to run, we had to re-implement a few of its perks: DOM mocking, JSX transpilation and (opt-in) module mocking.
Mocking the DOM
To mock the DOM, we followed this example in using jsdom:
// tests/testdom.js
module.exports = function(markup) {
  if (typeof document !== 'undefined') return;
  var jsdom = require('jsdom').jsdom;
  global.document = jsdom(markup || '');
  global.window = document.parentWindow;
  global.navigator = {
    userAgent: 'node.js'
  };
};
Then, at the top of any test that needs a DOM, we put this snippet:
require('./testdom')('<html><body></body></html>');This snippet needs to go before React is required, so that it knows about
the fake DOM. You could probably get away without setting global.navigator,
but we found that some libraries (e.g. D3) expected it.
JSX Transpilation
In any React.js project, you need to make a decision about whether to use JSX syntax. There are good reasons to go either way. We decided to use JSX and so we needed to adjust our test setup to deal with this. Having to do this is one of the downsides of JSX. It simplifies your code, but it complicates all the tools that work with your code.
To support JSX with Mocha, we used a Node.js “compiler”. This is a bit of
JavaScript that gets run on every require. It was originally created to
facilitate the use of CoffeeScript, but it’s since found other uses as the set
of “compile to JS” languages has expanded.
We based our compiler on this one from Khan Academy:
// tests/compiler.js
var fs = require('fs'),
    ReactTools = require('react-tools'),
    origJs = require.extensions['.js'];

require.extensions['.js'] = function(module, filename) {
  // optimization: external code never needs compilation.
  if (filename.indexOf('node_modules/') >= 0) {
    return (origJs || require.extensions['.js'])(module, filename);
  }
  var content = fs.readFileSync(filename, 'utf8');
  var compiled = ReactTools.transform(content, {harmony: true});
  return module._compile(compiled, filename);
};
Our compiler is slightly more complex than the Khan Academy compiler because we
don’t use a .jsx extension to distinguish our React code. As such, we need to
be more careful about which modules we process, lest the JSX compiler slow down
our tests.
To use this compiler, you pass it via the --compilers flag to mocha:
mocha --compilers .:tests/compiler.js tests/*test.jsThe . indicates that the compiler should run on files with any extension. If
you consistently end your JSX files with .jsx, you can specify that instead.
Our preprocessor also enables ECMAScript 6 transpilation. This lets you use some of the nice features from the upcoming JS standard like function arrows, compact object literals, and destructuring assignments. If you’re going to go through the trouble of enabling JSX transpilation, there’s really no downside to enabling Harmony and there’s a lot of upside.
You can find a version of the Jest/React demo using this setup in this repo.
Mocking/Stubbing Components
While auto-mocking modules has undesirable consequences, explicitly stubbing out React components can lead to faster, more isolated tests. Note that we’ll use the term “stub” from here on out instead of “mock.”
We initially tried to implement stubbing using proxyquire, but we ran into fundamental issues relating to the node package cache. If a module was stubbed the first time it was required, it would continue to be stubbed on subsequent requires, whether this was desirable or not. Disabling the cache led to poor performance.
We concluded that this was a job best done, again, by a node compiler. When a module is “compiled”, we check whether it’s in a whitelist of modules which should be stubbed. If so, we stub it. Otherwise, we transpile it as usual.
We tried to be smart about stubbing the precise API of each module (like Jest does). But this turned out to be harder than expected. After banging our heads against the problem, we realized that everything we’d want to mock was a React component. And React components all have simple, identical APIs. So we simplified our stubbing system by only allowing React components to be stubbed.
Here’s what the usage looks like:
require('./testdom')('<html><body></body></html>');
var React = require('react/addons');
global.reactModulesToStub = [
  'BigComplicatedComponent.js'
];
// When HighLevelComponent does require('BigComplicatedComponent'),
// it will get a stubbed version.
var HighLevelComponent = require('HighLevelComponent');
Supporting this makes the compiler a bit more complex. Here’s the gist of it:
// A module that exports a single, stubbed-out React Component.
var reactStub = 'module.exports = require("react").createClass({render:function(){return null;}});';

function transform(filename) {
  if (shouldStub(filename)) {
    return reactStub;
  } else {
    var content = fs.readFileSync(filename, 'utf8');
    return ReactTools.transform(content, {harmony: true});
  }
}
Note that this assumes that each React Component lives in a separate module which exports the Component. For larger applications, this is a common pattern.
You can find a fully-worked example using JSX and stubs in this repo.
Using Mocha
Now that we’ve added support for JSX/Harmony and module stubbing to Mocha, we can take advantage of all of its features and addons. We’ll walk through a few testing essentials.
Run Tests Quickly From the Command Line
This can be done via:
mocha --compilers .:tests/compiler.js tests/*test.jsTo run just a single file of tests, pass it as the last argument. You can also
pass --grep <test regex> to run a subset of a file’s tests. To run the
version of mocha specified in your package.json file, use
node_modules/.bin/mocha instead.
Mocha is considerably faster at executing a single test from the command line than Jest. For the simple Jest example test, execution time on my machine dropped from 1.65s to 0.138s, a 12x speedup. For projects with many tests, those seconds add up.
Debug Tests in a Browser
Most browsers provide comprehensive JavaScript debugging tools. If you don’t use these tools, you’re making your life harder! The inability to run Jest tests in-browser was one of the reasons we switched to Mocha.
Mocha tests typically use require statements and often access the file
system, so running them directly in the browser is challenging. The next best
thing is to use node-inspector, which connects a version of the Chrome
dev tools to the Node runtime used by Mocha.
To use this:
npm install -g node-inspector
mocha --debug-brk --compilers .:tests/compiler.js tests/your-test.js
Then run node-inspector. It will prompt you to open a browser at a debug URL.
From there, you can set breakpoints and inspect variables in the same way you
would in the Chrome Dev Tools:
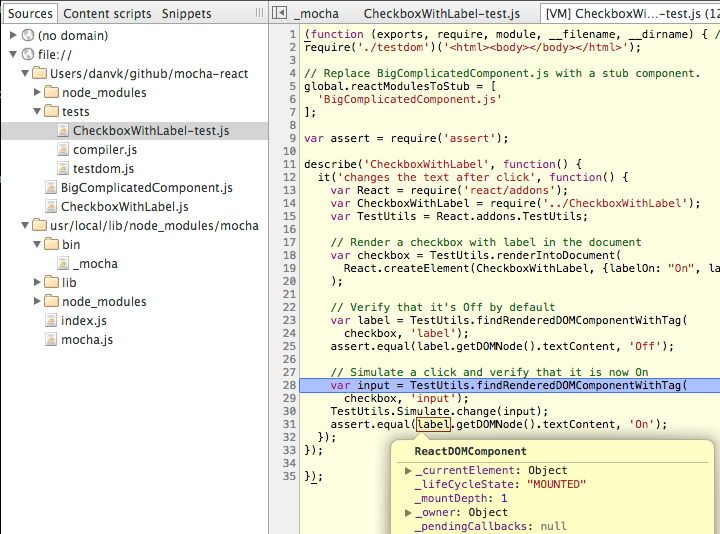 (Debugging a React/Mocha test with node-inspector. Note that this is transpiled code.)
Conclusions
Testing a React app with Mocha does require some extra plumbing, but we ultimately found the transition to be well worth the effort.
There are more advantages to using Mocha than just the ones we’ve discussed in this post. In the next post, we’ll talk about how we generate test coverage on every commit.
We hope that this post helps you find your way to the same happy testing place we have found!